Quick Start: Configure an Nstproxy ISP Proxy in an Nstbrowser Profile
TL;DR
To configure an Nstproxy ISP proxy in Nstbrowser, first copy the IP or host, port, username, and password from your Nstproxy dashboard. Then open the proxy settings in your Nstbrowser Profile, select the correct protocol, enter the proxy details, and click Check Proxy to confirm that the connection works. After saving and launching the Profile, use the built-in Claude AI Check tool or an IP checker to verify that the browser is using the fixed IP assigned by Nstproxy.
This guide walks you through the full setup process for using an Nstproxy ISP proxy inside an Nstbrowser Profile. Once configured, you can use a fixed ISP IP in an isolated browser environment, which is suitable for account login, team collaboration, multi-account management, and stable long-term access to international platforms.
A browser Profile that needs to be bound to the proxy, or a plan to create a new Profile.
A local network that can access both Nstproxy and Nstbrowser normally.
If you have not purchased a proxy package yet, open the Nstproxy dashboard and choose a suitable ISP proxy node. For long-term account login and account stability, it is best to choose a node that matches the account registration region or your target business region.
2. Setup Steps:How to configure Nstproxy with Nstbrowser
Step 1: Log In to Nstproxy and Copy the Proxy Details
Open the Nstproxy website and log in to your account dashboard.
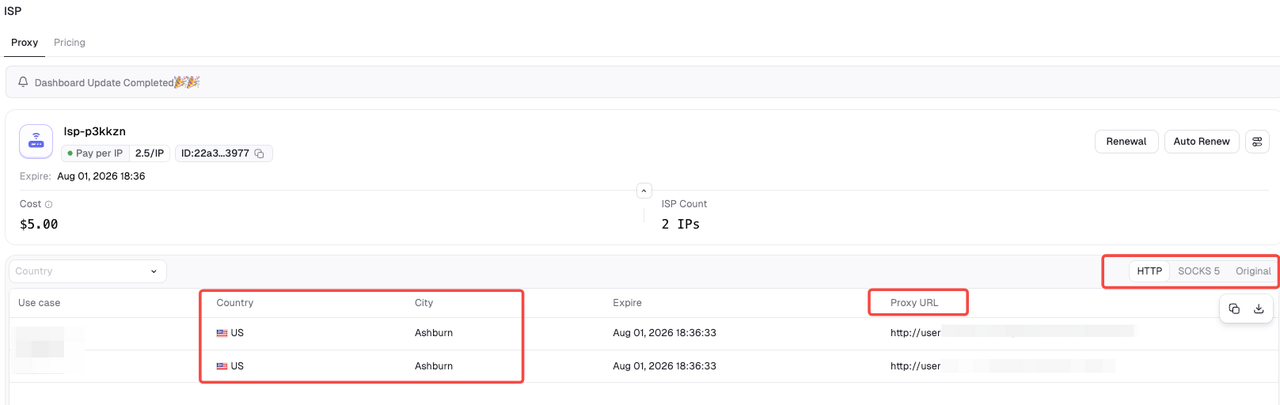
In the proxy management or package management section, find the ISP proxy you purchased. Open the node details and copy the generated proxy connection information, usually including:
IP / Host
Port
Username
Password
Proxy type / Protocol
You will enter this information in the proxy settings area of Nstbrowser.
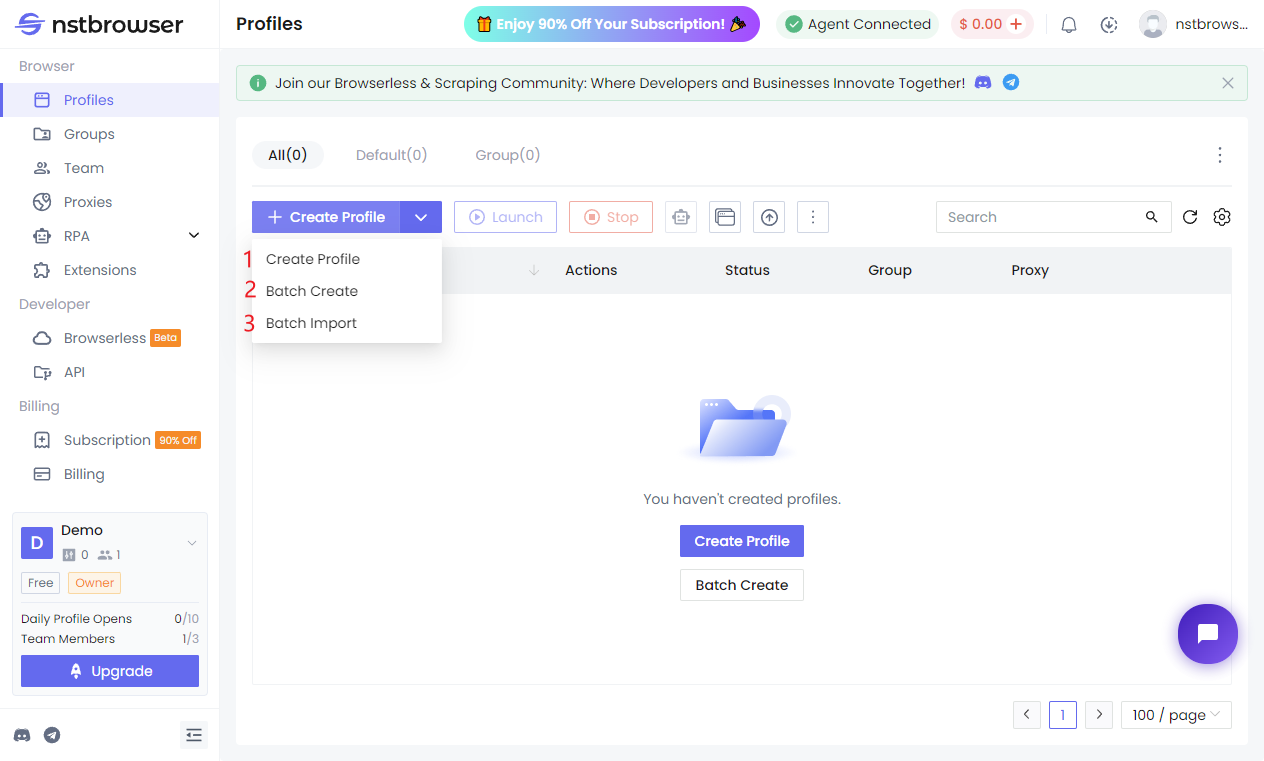
Click Create Profile to create a new browser environment for the current account or business scenario.
Use clear naming rules for your Profiles, such as:
- Claude-US-01- TikTok-US-01- Amazon-Store-01
If you manage multiple accounts, it is recommended to use one dedicated Profile for each account. This helps prevent cookies, cache, browser fingerprints, and login environments from mixing across accounts.
Step 3: Enter the Nstproxy Details in the Proxy Settings Area
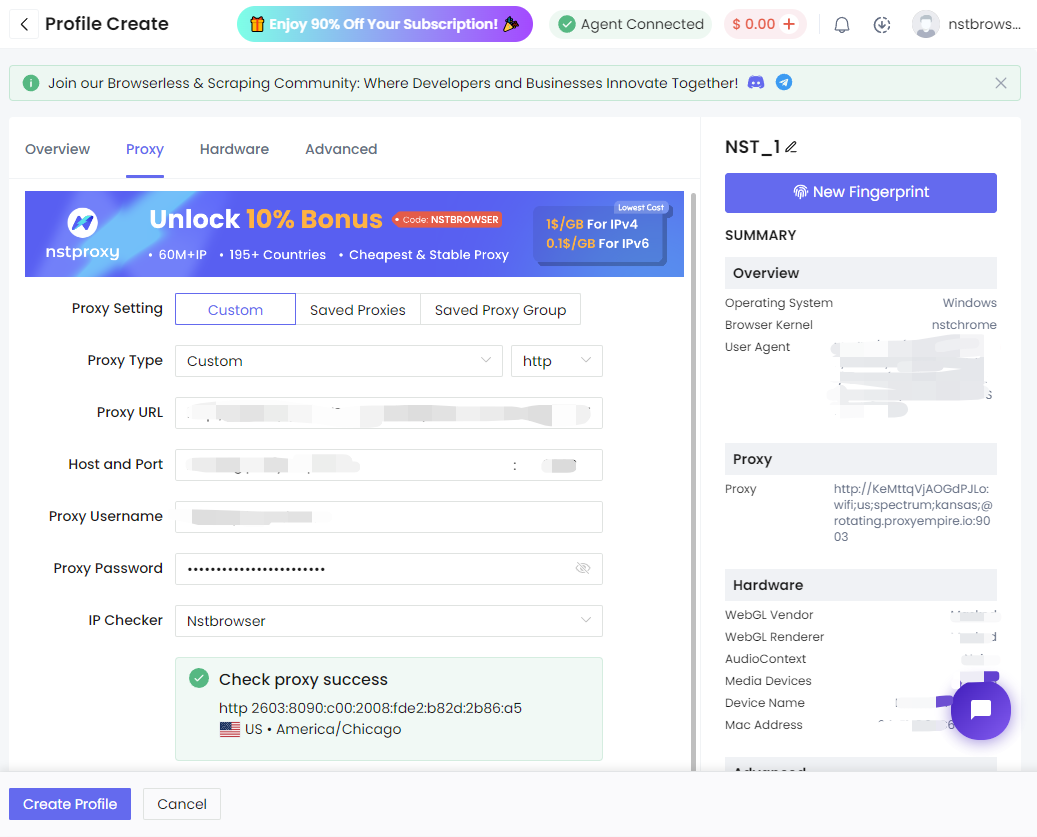
On the new Profile page, find the proxy settings area, choose Custom, and enter the proxy details copied from your Nstproxy dashboard.
After entering the details, click Check Proxy first.
After the proxy test succeeds, check the following:
Whether the IP has changed to the region you purchased
Whether the proxy is available
Whether latency is stable
Whether region and timezone are consistent
If the test fails, first check whether the IP, port, username, and password were copied correctly.
NOTE: Be careful not to copy extra spaces, especially in the username and password fields. If the proxy information contains uppercase letters, lowercase letters, or special characters, keep them exactly the same.
Step 4: Save and Launch the Profile
After the proxy test succeeds, click Save.
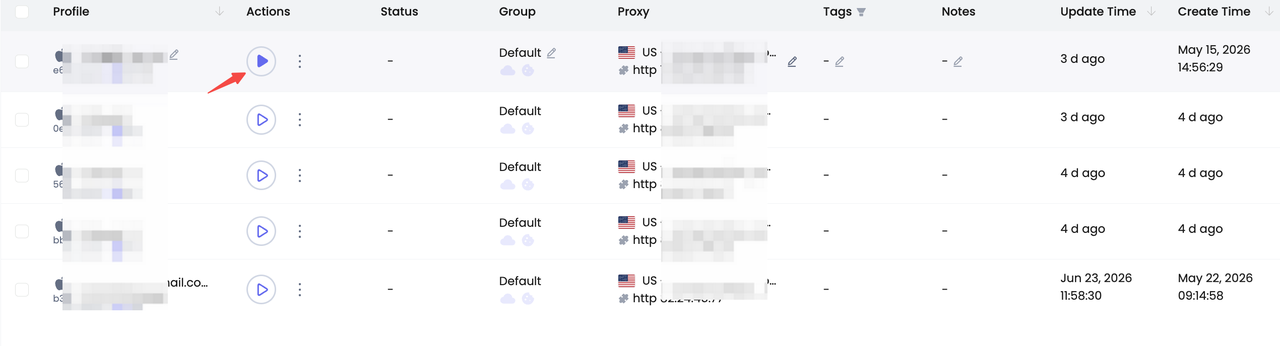
Return to the Profile list, find the Profile you just created, and click Launch icon. Nstbrowser will open an isolated browser window. This window will now access the internet through the Nstproxy ISP proxy bound to the Profile.
For long-term use, keep using this Profile to log in to the corresponding account. Avoid frequently changing proxy nodes or mixing unrelated accounts in the same Profile.
3. How to Verify That the Proxy Is Working
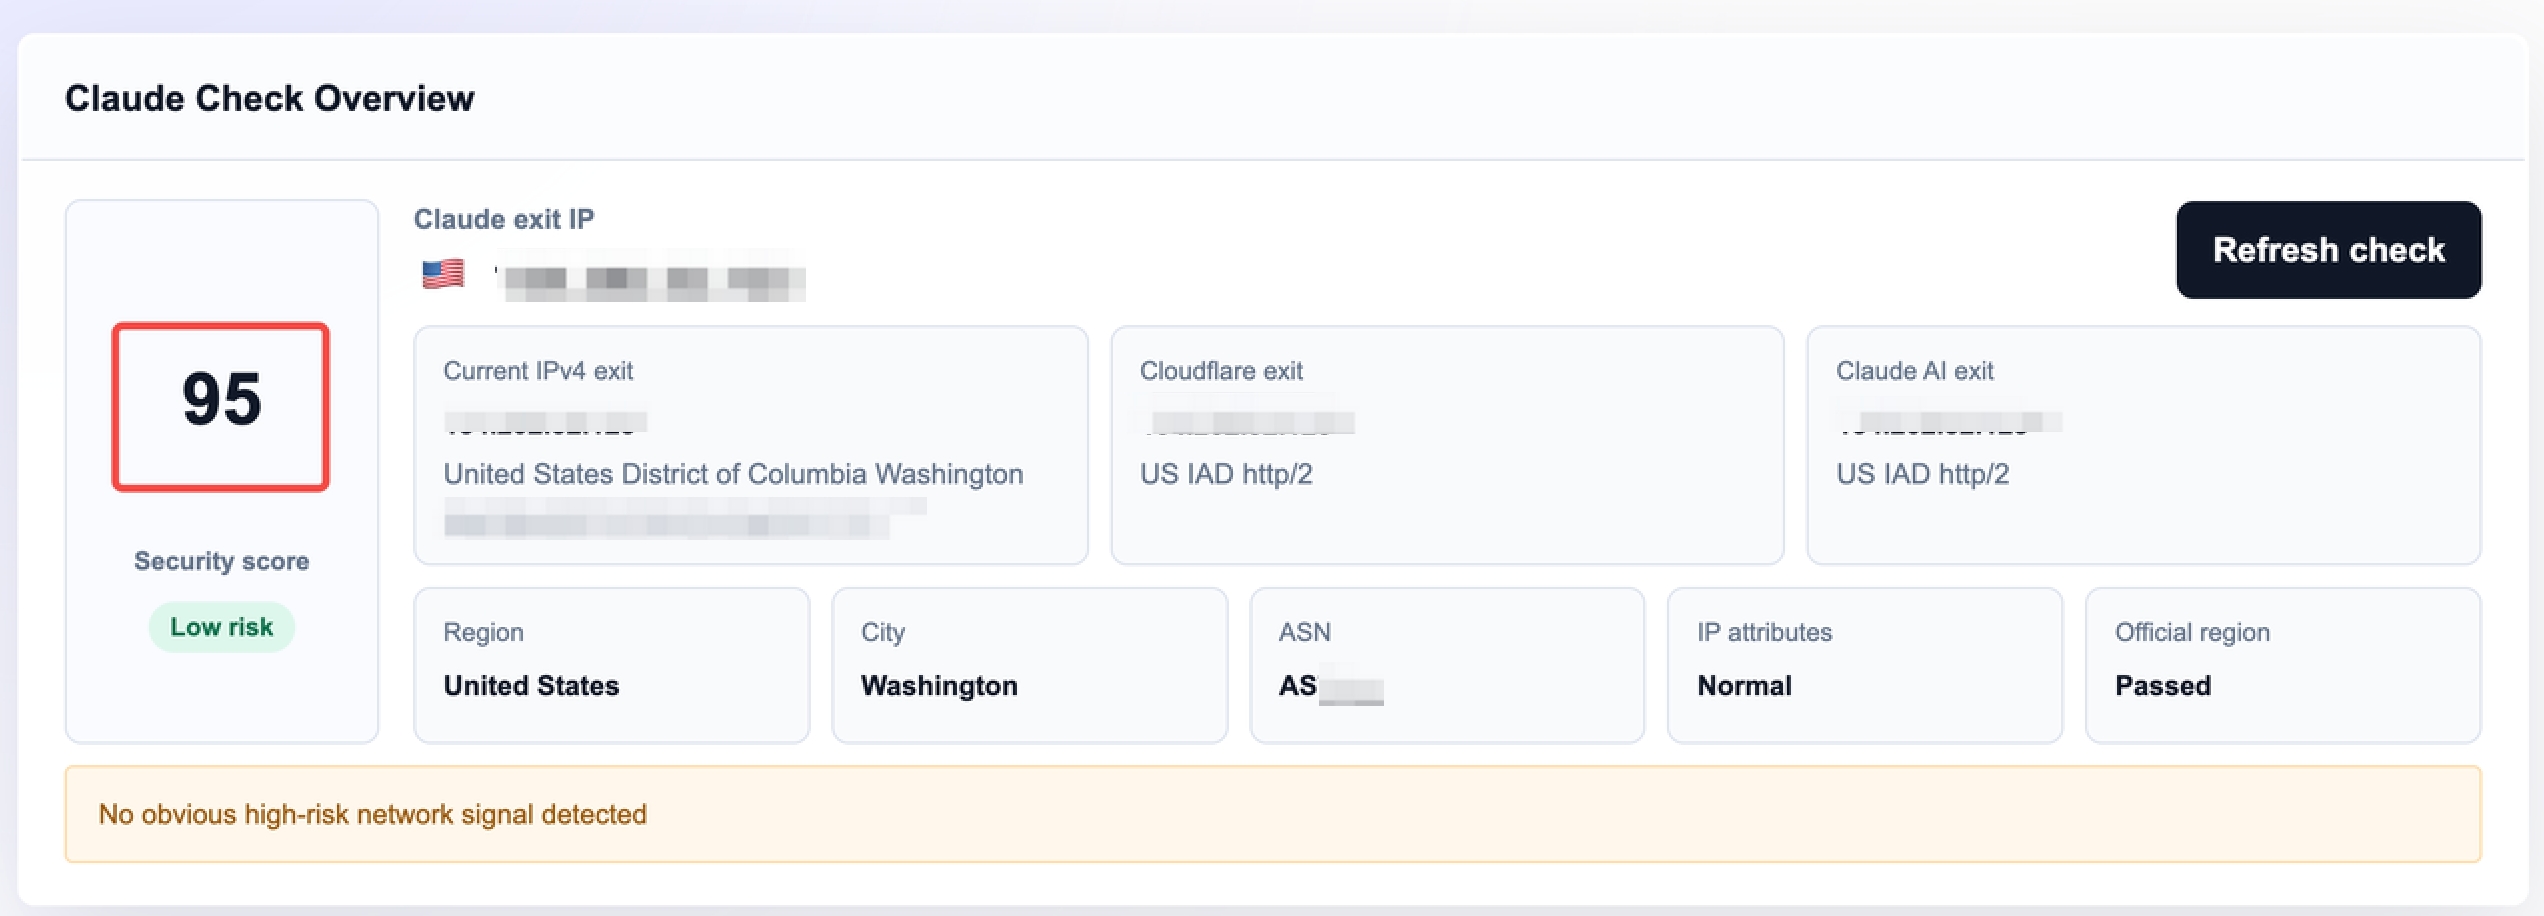
After launching the Profile, use the built-in Claude AI Check tool in Nstbrowser to check the network and browser environment. Confirm that the current browser environment is using the fixed IP assigned by Nstproxy.
Focus on these indicators:
Whether the current IP matches the IP assigned in the Nstproxy dashboard
Whether the country and region are correct
Whether the timezone matches the proxy region
Whether DNS results show any obvious issues
Whether WebRTC exposes the real local IP
If the detected IP matches the IP assigned in the Nstproxy dashboard, the proxy has been configured successfully.
If the detected IP is still your local IP, the proxy has not been correctly bound to the current Profile. Go back to the proxy settings and check the configuration again.
4. Configuration Best Practices
For a more stable experience, follow these rules:
Use a Static ISP proxy for long-term accounts, and avoid frequent IP switching.
Create a separate Nstbrowser Profile for each important account.
Use clear Profile names to make team management easier.
Keep IP region, account region, timezone, and language settings as consistent as possible.
Check regularly that the proxy is still valid.
Do not mix multiple unrelated accounts in the same Profile.
5. FAQ
1. What Should I Do if the Proxy Connection Fails?
Troubleshoot in this order:
Check whether Host, Port, Username, and Password are correct.
Check whether the selected proxy protocol is correct.
Confirm that your Nstproxy package is still active.
Confirm that the current node has not been paused or expired.
Change your local network and test again.
If the issue continues, contact Nstproxy customer support or technical support.
Most connection failures are caused by incorrect ports, protocols, usernames, or passwords. Re-copying the information from the dashboard is often the fastest first step.
2. How Do I Change the Proxy Region?
If you need to change the proxy region, go to the Nstproxy dashboard and select or purchase an ISP node in the target region.
After getting the new proxy details, open the proxy settings for the corresponding Nstbrowser Profile, replace the Host, Port, Username, and Password, and click Check Proxy again.
Note: If the Profile has already been used for long-term login to an account, frequent region changes are not recommended. The account registration region, login region, and browser environment should remain as consistent as possible.
3. How Can I Share a Configured Profile With Team Members?
If your team needs to share one account or one browser environment, you can use Profile sharing or team collaboration features in Nstbrowser.
Before sharing, confirm that:
The Profile is used for only one account or one business scenario.
The Profile is bound to a stable Nstproxy ISP proxy.
Team members do not frequently log in from different regions at the same time.
Cookies, cache, and login status in the Profile are not cleared casually.
The team has clear account usage rules to avoid conflicting actions.
If you are managing a multi-account matrix, do not use the same Profile for multiple accounts. A safer setup is one account, one Profile, and one independent ISP proxy.
4. Do I Need to Test the Proxy Every Time After Setup?
You do not need to test the proxy every time you launch the Profile, but it is recommended in these situations:
After the initial setup
After changing proxy nodes
After changing the local network
When the account shows login issues or verification prompts
When reusing a Profile after a long period of inactivity
Regular checks help you detect proxy expiration, region mismatches, or browser environment conflicts early.
6. Summary
Configuring an Nstproxy ISP proxy in Nstbrowser is straightforward:
Log in to the Nstproxy dashboard and copy the proxy details.
Create a new Profile in Nstbrowser.
Enter the proxy protocol, Host, Port, Username, and Password.
Click Check Proxy to confirm that the connection works.
Save and launch the Profile.
Use Claude AI Check or an IP checker to confirm that the proxy is active.
After setup, you can use a fixed ISP IP inside an isolated Profile and maintain a more stable, consistent account access environment.
A decision-focused comparison of GitHub, Context7, Playwright, Firecrawl, and a controlled Crawl-backed MCP pattern for Cursor.
Lena Zhou
Aug. 21st 2026
110M+ real IPs with 99.9% access success
Blazing-fast average response ~0.5s for high-concurrency tasks
From only $0.1/GB
Get immediate access to premium residential, datacenter, IPv6 and ISP proxy pools.